It's back, and it's bigger than before!
The Cambridge 23 Things programme 2011, for Cambridge library staff, is now live! Any questions, big or small, email us at cam23things@gmail.com
Just one 'thing' this week - not a shiny online tool to play with, not a download or a widget in sight - but a chance to catch our breaths, to catch up and to meet up.
Whether you're doing these 'things' for the first time or refreshing your knowledge, try and take a bit of time this week to think about how it's going.
What have you learned that's new?
What have you enjoyed about '23 things' so far?
Which of the things do you love/hate?
Which ones will you carry on using?
Can you incorporate the things you're learning on this programme into your (working) life?
Use your blog to share your thoughts, chat to colleagues or come along and reflect with some other 23Thingers at the B Bar from 6pm tonight.
Hope everyone is enjoying the programme so far! Thanks to everyone who let us know their preferred dates for the reflection week meetup. The runaway favourite was Monday 25th July. The venue is B Bar on Market Passage, and I'll be there from 6pm or just before. Looking forward to seeing lots of you there!
How many times do you email a document to yourself to transfer it from work to home?
Or look at the various versions of a document on your hard drive and USB drive wondering which one is the most current?
Or want to send a photo or video to someone and find that the file is too big to email?
Google Docs are a great way to share documents with others - or to access the same material from different computers but sometimes you want to keep your file formatted exactly as it is.
This is where Dropbox can be useful. It provides you with a secure online storage space so that you can share files and access them from different machines.
Getting started with Dropbox
1. First step is to go to the Dropbox website, set up an account and download the program, ideally onto each of the machines that you use regularly.
Once downloaded, the little blue Dropbox icon sits in the taskbar at the lower right-hand corner of your screen. You will also see a My Dropbox folder sitting among the folders on your machine. (By default it places itself inside the My Documents folder but you can move it.)
2. Drag or save folders or files into this Dropbox folder just as you would any other folder.
3. Now go to another computer. If it has Dropbox installed, log in and you'll see your files in the My Dropbox folder. If it doesn't, log into the Dropbox website and the files are there.
If you change the file, it's automatically updated for wherever you next look at it.
You can also use Dropbox on various mobile devices.
Sharing files with Dropbox
There are two types of sharing - using shared folders and using the public folder.
Shared folders
You can invite other Dropbox users to join a shared folder, much as you would share a Google Doc. If one person changes a file in the shared folder, everyone sees the updated file.
Using the public folder
If you want to share a file with someone who doesn't have a Dropbox account, you simply put the file into the public folder, right-click and then click on 'Copy public link'. This gives you a URL that you can post into an email to share the link.
I find Dropbox pretty easy to use. I like having an online backup for the files that I'm working on currently and it's a handy place to save back-up copies of presentations. But I mostly use it in the library as part of our image supply service. We supply digital images to publishers that are far too large to supply via email so nowadays we mostly use the Dropbox public folder.
I have a couple of gripes about it - that each individual file has to have its own public link (so 5 photos means 5 links to click) and sometimes our customers have trouble opening the links. My biggest gripe is that it's not as good for file-sharing as the much-missed drop.io
My other major gripe about Dropbox is the relatively measly 2GB limit for a free account. If you're sharing photos or videos, that's not a lot. One way to increase your limit for free is to refer others to Dropbox. So if you are installing it, do so via this URL. That way you and I both receive an extra 250MB of storage.
I'd be interested in the comments to hear about other library uses...
There is a fair bit to cover this week so feel free to have a play around with these 'Things' but don't worry if you can't explore them fully!!
The problem:
When you want to comment on webpages you find that you have to have an account with them and that the comments are filtered and screened. You also want to be able to make comments on webpages and archive them along with your own notes.
The problem-solvers:
Pushnote is a new browser plug-in, supported by Stephen Fry, that allows you to post uncensored comments on sites across the web whether or not the site supports comments itself. You have the ability to follow friends and read their comments and ratings as well as select to see the most popular webpages. Pushnote was launched in January of this year and is still in beta format. There is a facility to publish your comments to Twitter and/or Facebook and there is a set of FAQs on their website that is pretty helpful.
Evernote allows you to take notes on webpages and archive them for later consultation. Your notes can have file attachments and be sorted into folders, tagged, annotated etc. There is a paid version as well as a free version (limited to 60 MB/month and there is a usage bar so that you can keep track).
2.Create an account and choose whether you want to follow your Facebook or Twitter friends, who have Pushnote, or neither.
3. You then install for whichever internet browser you have: Chrome, Mozilla or Safari. (Pushnote cannot yet be used on others but this is in the pipeline).
4. Installation is quick and easy and there is a helpful page pointing out the various features of the 'Pushnote page'. Installation results in a star icon appearing on the top right of your screen (just under the minimise and cross buttons). It will be green when you visit a page that has comments and red when your friends have made new comments on a page on the web.
5. Clicking on the 'Pushnote.com' at the top will take you to your account where you can make changes to your settings.
6. Now comes the exciting bit. Go to a webpage, say the BBC homepage, and click on the star icon. This will bring up the 'Pushnote page' with references, ratings and comments of your friends.
7. Making a comment yourself is very easy - just fill in the box with a star rating and click on whether you want to share it with Facebook and Twitter.
8. Once you have commented your 'Pushnote page' will look like this:
So this allows us to rate and comment on pages as well as instantly access information on the webpage be it about the reliability of the product, breaking news, suggestions for improvements, interesting things people have discovered or how better to access information.
Further reading:
This article weighs up the pros and cons of Pushnote in the business world and we can use this to think about its uses in the information sector.
2. Sign up for an account (you will need to get the confirmation number from an e-mail they will send you) and get to the welcome page.
3. Download Evernote according to their Getting Started pages and follow their instructions and sign in to your account. You can create a note by clicking on New Note. You can add URLs and tags and decide which folder to put it in. It saves it automatically and it appears in the central panel, which you organise to view by date created, updated or title.
4. Evernote is not just for making notes but can be used for archiving pictures from your computer or webpages or photographs taken during conferences to save you having to take notes all the time. All you have to do is to click New Note again and click and drag a photograph from the web or your computer etc. and drop it into your new note (or you can copy and paste if you prefer).
5. You can use the View and Edit drop down menus to alter how you view your information and the Usage button along the top tells you about your monthly use. The File menu also allows you to organise your notes and attach files etc. Evernote for Windows or Mac will automatically synchronize your notes with Evernote on the Web every few minutes, but you can manually sync any time by clicking the Sync button. (This means that changes you make to your Evernote account on different appliances i.e. computers, phones or mobile devices will all synchronise to keep your account up to date).
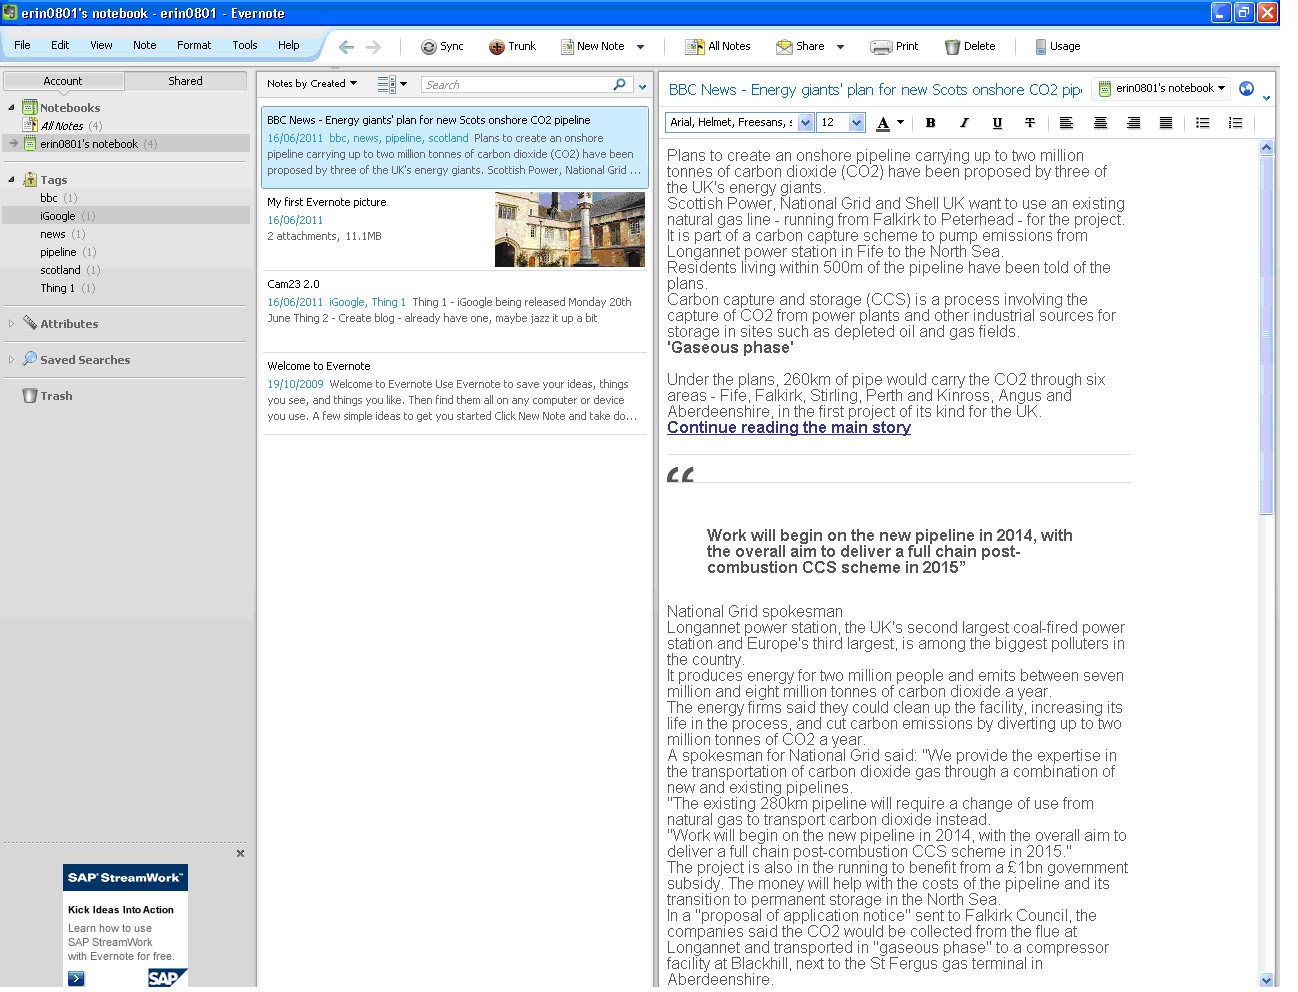
6. You can also save web content, which involves installing the Web Clipper (a quick and easy process which adds the Evernote button to your Internet browser). All you need to do is to highlight the information you want to save and click on the Evernote button. I highlighted a BBC article, clicked on the elephant, added tags when prompted and went to my Evernote page to find it had been filed with my other notes:
This is a really useful tool for bringing together everything that you look at on the web as well as drawing together photos, notes and text from various sources to one location, easily accessible from a variety of devices.
A bit more:
Have a play around with folders, tags, searching and how to integrate Evernote with Facebook and Twitter.
Coming up:
Why not try our Extra Thing this week which is Dropbox?!
Thing 9 is your chance to create a document online and share it with other cam23 2.0 colleagues via Google Docs. You might be thinking "why would I want to do that?". Watch the video below for some of the reasons why Google Docs is useful:
Google docs is particulary helpful if you are working on a collaborative project with colleagues outside your library. You can put up a document and share it with the others. All of you can edit it and there is just the one version rather than lots flying around via email. Also if a file is large (e.g. a powerpoint with lots of images) you don't need to worry about size limits on email accounts. The cam23 2.0 organisers made use of Google Docs to plan this programme and update the information centrally.
Google Docs may also be used as a place to just store some files, especially if you are working across sites or want to access some files at home but can't get onto your office network. Instead of moving everything about on a flashdrive you can save it up on Google Docs and, as long as you have access to the internet, you will have your files.
How do I get started using Google Docs?
1. Go to Google Docs and sign in with your Google account email and password (or set one up if you don't have one - you don't need to have a Gmail account you can use any email).
2. Click on Create New under the Google Docs logo and choose either a document, presentation, spreadsheet, form or drawing.
3. Depending what type of document you chose you will get a different work area. Enter your text and use the toolbars to help you format and save your work. When finished just close the window to return to the Google Docs home page where your file should appear under modified today. For more information check out the Google Docs help.
4. If you have created the file on your PC then instead of clicking on Create New, just click on Upload and then Files and find the file you want to upload. You will also see a settings option which allows you to confirm if you want your files converted to a Google docs format or not.
5. You are now ready to share your file. Click on the share button in the top right corner and an option box will open. Enter the email addresses of the people you want to share it with or make it public to the world. You have the option to allow view only or edit permissions. The people you share it with will receive an email with a link to the document. It will also be displayed on their Google Docs home page. A word of warning. If people are registered on Google with a gmail rather than their @cam address then this is the email you need to enter.
Experiment and blog about it
Even if you do not wish to share files, Google Docs is great for creating quick forms and embedding them in your web page. You have already used one when you registered your blog for cam23 2.0. At Classics we use it for our book suggestion form on the website, check Book Suggestions. We find it useful as we receive an email when the form has been completed and all library staff are able to view the spreadsheet that the form populates.
Why not try out a form on your Cam23 2.0 colleagues. I quickly set up the following form finding out about your use of Google Docs. Why not give it a go by following the link and let me know what you think of Google Docs?
During the first reflection week we thought it might be nice to have a Cam23 2.0 meetup, to have a few drinks and chat to other participants.
Now that we're all Doodle experts thanks to Erin, I've set up a poll to see when the best day would be during that week (w/b 25th July). It would be great if as many people as possible could make it, so please take a few seconds to mark your preferred dates in the poll.
So many libraries, so many books. How do you keep track of them all? Newton very helpfully sends out emails before (and after!) your books are due but it's good to have some additional reminders to stop those fines from mounting up.
The nice people at the UL have created the Cambridge Libraries Widget to make it easy to keep track of all your loans. You can embed the whole widget into your iGoogle page, Facebook, CamTools or into any webpage (perhaps your library's?). It gives you a Newton search window and the ability to manage your loans, renewals and requests.
Embedding the widget into your iGoogle page is as simple as pressing a button on the Widget page.
But seeing your loans still means logging into the Widget. It might be more helpful to have them inserted directly into Google Reader or your Google Calendar which you'll probably look at more regularly.
How to view your loans in Google Reader
1. Make sure you're logged into Google.
2. Log into the Library Widget. You can find it embedded in many DepFac and College library webpages. For example, go to the English Faculty Library webpage. Click on the tab on the righthand side called 'Library Accounts and Renewals' and log in.
3. Choose the Feeds tab and click on the first link 'RSS loans feed'. It will offer you the option of adding the loans feed to your iGoogle homepage or to your Google Reader.
How to view your loans in Google Calendar
1. Open your Google Calendar.
2. Log into the Library Widget (as instructed above).
3. Choose the Feeds tab and right-click on the second link 'iCal Calendar Feed'. Choose 'Copy link location'.
4. Go to your Google Calendar and open the 'Other calendars' section on the lefthand side. Click 'Add' and choose 'Add by URL'. Paste the iCal link in the box and press 'Add Calendar'.
5. You can use the 'Settings' feature under 'Other calendars' to rename or otherwise customise your calendar.
Extra Extra Thing
Take a look at the Libraries@Cambridge calendar which brings together all manner of library calendars. You can copy feeds or individual events from it to your own calendar.
You need a calendar, which can be accessed from any computer and can be shared with other people.
The problem-solver:
Google Calendar is a free web-based calendar which can be shared with other people and accessed from anywhere with Internet connection. Events can be added quickly and viewed by day, week or month. It can also be integrated with other Google services, such as iGoogle, and imbedded in web pages and blogs.
A lot of institutions already have Google Calendar on their web pages to keep their staff, students and followers. Libraries such as the Ul, are using Google Calendar to publicise opening hours and events.
3. Before you add any events to your calendar, go to the left of the screen and select Settings under My Calendar and then click on the General tab. In this General section you can change the time and date formats, plus have a mini icon of your local weather displayed and choose whether to show weekends etc.
4. Click on Save.
How to add events:
1. To add an event, click on Create event on the left of the calendar(you can also select Quick add or highlight a date on the calendar (probably the easiest)). 2. Fill in the boxes for your event and add duration, location and whether you want to have a reminder at some point before the event.
3. Click on Save and you will be taken back to the calendar with your new event visible!
How to add your calendar to your iGoogle page (from week 1):
1. Go to your iGoogle page. 2. Click on Add Gadgets. 3. In the Search for gadgets box on the right of the screen, type in Google Calendar.
4. You want the first on the list - click on Add it now. 5. Click on Back to iGoogle and your calendar will be displayed!
1. Under the My calendars section on the left side of your calendar home page, click on the drop down menu next to your e-mail address and select Share this calendar. 2. You will be taken to the Share this calendar section. 3. Type in the e-mail address of the person you would like to share your calendar with and their details will appear automatically underneath (note: this person must also have a Google Calendar too otherwise you won't be able to share it!).
4. Set the Permission settings you would like this person to have. 5. Click on Save.
Next time...
You’ll be getting to grips with Google docs or why not try this week’s ‘Extra Thing’ – adding a library books feed to Google Reader and Google Calendar?!
You are always trying to organize events/meetings and are fed up of dealing with group e-mails and constant rearrangement of times.
The problem-solver:
Doodle is a simple, free way to schedule any event which includes several people. There is no registration required and the basic idea is that you set up an ‘event’ and input several days and times that are suitable. You then invite all attendees to go to a webpage and view the suggested times. They tick which they are able to attend, and by the end you should be able to see which time most people can make.
3. Follow instructions for Steps 1-4 each time clicking ‘next’ to get to the next page.
At Step 1, you come up with a title for your event and, if you want, add a location, which is automatically linked to Google maps to show your participants where the even will be.
At Step 2, you decide on the dates that you are free and the time slots within each date that you are free and add them in the chart. If you want more time choices then you can add these at the bottom.
At Step 3 you can change the settings and allow participants only to give one answer or to answer yes, no, or maybe etc.
At Step 4 you need to decide whether you want to send an email to your colleagues/friends yourself or whether you want Doodle to do this. I tend to send the link myself but it is up to you!
4. If you have chosen to send the poll out yourself then check your e-mails from Doodle and follow the clear instructions in them.
5. Send the link out and wait for responses. Doodle will send you an e-mail every time someone votes.
6. You should get something like this in the end with a running total along the bottom to indicate when the most popular times are.
There's no extra Thing this week, but please take a bit of time to read the other blogs and encourage those new to the programme this year. Your comments and any advice will be really appreciated I'm sure. We'll have a new Extra Thing for you next week!
Ever noticed that you’re demonstrating the same process on the computer time and time again to different students? Perhaps they weren’t paying attention at induction, or it’s just something you don’t have time to cover at the start of term? Well then screencasting could be the thing for you.
Screencasting is the process of recording your actions on your computer as a video (with or without sound), which can then be shared with other people on your website/via YouTube etc. So it is perfect for making short demo videos for students, but has potential as an application beyond that too.
There are a number of screencasting tools available online, both free and for purchase. If your place of work already subscribes to Adobe Captivate then it is a fantastic tool to use, but it will otherwise cost a fair bit to purchase. I’m also aware that it can be difficult to download programmes onto work machines, so I have chosen to use Screencast-o-matic http://www.screencast-o-matic.com/ . Please note that you will need Java installed - sorry, I can’t find a good product that doesn’t require it.
There’s no need to create an account to record a screencast, but you might want to consider it if you want to store the videos on Screencast-o-matic. You can also watch a demo that takes you through how to do a recording, but the best thing may just be to dive in and press ‘Start recording’ on the top right.
A frame will appear on your screen, with some brief instructions. Frame the screen as you wish, and change the other options at the bottom of the frame as desired. Then press the red record button and go! Be aware, if your computer has a microphone it will be recording even if you don’t have anything to say. Avoid background noise like radios too. One more tip – go much slower than you would usually! Demonstrations done at normal speed are far too fast!
Screencast-o-matic will record up to 15 minutes of footage. Once you’re done press the ‘done’ button and choose where to upload your video to. If you save it as a video file (which you can then embed onto a website), you have a choice of format. Ask your IT officer if you want any help ensuring you choose a compatible format. Or, choose YouTube to get the video out to the world – it really depends on whether your demonstration includes password-protected resources.
Have a go and see what you think! Try a video without commentary first. Then, if you like the format, try formulating a script to go along with the demonstration.
When that's what you want, something fantastic from flickr usually does the trick. Sometimes we have to depict things that are a little more mundane, like showing how your iGoogle looks, so how do we make the decidedly un-wow a little bit more, well, wow?
Screenshots, they're simple, eh?
It's true they are as simple as you want to make them. At the most basic level you can hit Shift + Print Screen, open MS Paint (other products are available...), Ctrl +V, edit, save your picture then upload it onto your blog. Simples, as the talking meerkat says. Simples indeed, but also incredibly faffy, especially if you have to do a lot of them and the quality can be poor. The solution is to try something a little more sophisticated.
LightShot- the little black dress of addons
Whenever I install a browser I like to pimp it with all my must have addons. Some of these work very hard for me, others decide how pages will display, one even keeps me on the light side by replacing content from the Daily Mail with pictures of tea and kittens. But if I had to strip it down to a handful of must-have addons, Lightshot is my irresistible little black dress- simple yet sophisticated.
A screenshot of my simples image search
LightShot is available as an addon for Firefox and Chrome, it appears as a purple feather in the corner of your toolbar. When you want to take a screenshot simply click the feather. The screen will grey slightly, which is your cue to click and drag to surround your subject. Release the mouse button and your screenshot is confirmed. From there you have a handful of options:
Save your shot to your computer
Copy the shot
Edit it there and then
Print your shot
Upload it to the web to share
Using LightShot is quick and easy- ideal if you are taking lots of screenshots, and the nature of the tool means you can select just the area you want to show, saving all that fiddly editing in MS Paint.
Selecting just one image from my search
Saving the images to your computer is the ideal way to use LightShot to add screenshots to your blog; you can also choose from a range of web-friendly formats, meaning you'll never have to settle for that grainy bitmap ever again. If you want to save screenshots or text/images you've clipped from the web, you can use the quick share twitter and Facebook options, or upload it to the Lightshot page where your image is given a unique URL.
Wait, there's more?
There sure is! LightShot is available as a stand alone utility that you can download directly onto your desktop. As well as capturing and manipulating images from the web, you can take a screenshot of anything on your desktop, save it and use it as a standard image object. That means you can place it in an email, shrink it for a Word document, or invert it in a slide show. Again, simples. Check out this video to see how easy it is.
If you haven't yet added screenshots to your post, why not try the LightShot addon for your browser. And if your appetite has been whetteted there's a whole range of free image capture tools for everything from simgle images to video.
This is just the tip of the iceberg for browser tools, skins, addons and extensions. You can find everything you need to 'pimp your broswer' here- Firefox, Chrome, Internet Explorer, Safari, Opera. Take some time to explore and share!


 by sally_monster, on Flickr")


